
Last Updated: 16 May 2016
Lab Length: 20 minutes
Objective
Up to this point everything for projects and tasks has been read only. We are going to be implementing the functionality to add data.
Key Concepts:
- Ionic Modal Dialog usage
- Adding icons into the Header
- Updating an ion-list with new items
- Making a REST post call to the Back& API
Table of Contents
10.0: New Project Page
To add a new project we are going to use a modal dialog on the projects page to popup the form. Our form for this lab will consist of a single field for the project name. The Ionic Framework has a modal dialog directive built into it that we can leverage.
10.0.1: Modal Dialog
Create the modal template file
- In the www/templates directory created a new file called projects-modal-add.html
- In the projects-modal-add.html file, use the
i1_modal_htmlsnippet to generate the view boilerplate code and set the title to “New Project” - Press Esc or Enter to exit the snippet
Wiring up the show and hide for the modal
In the www/templates/projects-modal.add.html file to the
ion-header-barwe are going to add a button to the header after the title that will close the dialog when it is opened.<button class="button button-clear button-positive" ng-click="vm.closeProjectModal()">Cancel</button>- Open up the www/js/controllers/projects.controller.js file
Inside the
activatefunction we need to setup theionicModalwith what template to use and set the scoping variable for the modal.$ionicModal.fromTemplateUrl('templates/projects-modal-add.html', { scope: $scope }).then(function (modal) { vm.projectModal = modal; });Make sure to inject
$scopeand$ionicModalinto the controllerProjectsController.$inject = ['ProjectsService', '$ionicModal', '$scope']; function ProjectsController(ProjectsService, $ionicModal, $scope) { ...... }In order to have the modal open and close we need to create the functions to call the vm.projectModal
show()andhide()functions.function showProjectModal() { vm.projectModal.show(); } function closeProjectModal() { vm.projectModal.hide(); }We need to make sure that these 2 functions are exposed to the view by adding them to the vm variable at the top of the
ProjectsControllerfunctionvm.showProjectModal = showProjectModal; vm.closeProjectModal = closeProjectModal;To prevent a memory leak, you should also tell Angular to remove the modal when the view goes out of scope and is destroyed.When a page is going to be removed, Anguar broadcast the event $destroy. To remove the modal, we need to call the
removefunction.$scope.$on('$destroy', function () { vm.projectModal.remove(); }); The last thing before we can test the show and hide functionality is to add a way to launch the modal dialog on the Project page. We are going to do that by adding an icon into the header that will launch the modal.- Open the www/js/templates/projects.html file
- Between the
<ion-view>and<ion-content>we need to add a<ion-nav-buttons>section by using the ionici1_navbuttons_rightsnippet- ng-click: vm.showProjectModal()
- content: use the
i1_iconplussnippet
- Press Esc or Enter to exit the snippet editing
- To the <button> element add the css class
button-icon - If you don’t already have ionic serve running, open a command prompt and run the command ionic serve
- On the Projects page you will now see a
 . If you click on the icon the “New Project” modal should open up and if you click the cancel text on the modal it should close it.
- On the Projects page you will now see a
Now lets add the actual form to input the “New Project”
- Open the www/templates/projects-modal-add.html
Inside of the
<content>section add the following form<form ng-submit="vm.saveNewProject(vm.project)"> <div class="list"> <label class="item item-input item-text-wrap"> <input type="text" placeholder="Project Name" ng-model="vm.project.name"> </label> </div> <div class="padding"> <button type="submit" class="button button-block button-positive">Create Project</button> </div> </form>When you open up the modal, the form will look like this
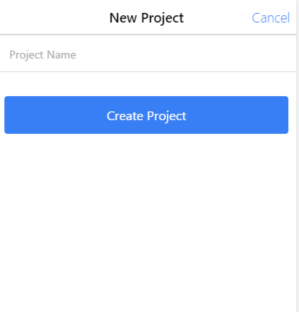
We are now ready to wire up the form to post data to the API.
10.0.2: Posting to our API
In this section we will be adding the functions needed to send data to the API and bind it to the UI for the Project page.
Creating the Service Add Functions
- Open the www/js/services/projects.service.js
Add a new function called
addProjectthat takes 1 parameter called name.function addProject(name) { }Don’t forget to expose the function by adding it to the service object at the top of the
ProjectsServicefunctionvar service = { getProjects: getProjects, addProject: addProject };- In the
addProjectfunction we are going to create a JSON object calledprojectthat has properties:nameandcreated_on.- name: name
created_on: new Date()
var project = { “name”: name, “created_on”: new Date() };
To send data to Back& we need to create a $http post call that calls the Back&
projectendpoint. This will then return a promise that we want to capture and returnresult.datareturn $http({ method: 'post', url: Backand.getApiUrl() + '/1/objects/project', data: project, params: { returnObject: true } }).then(function (result) { return result.data; });
Wiring Up the Controller
- Open the www/js/controllers/project.controller.js file
- Create a new function called saveNewProject that takes in an object named project
This function will call the
ProjectsService.addNewProjectfunction and upon successful adding of the new record, will add the project to the UI project list, close the modal, clear out the new project name form field and redirect the user to the tasks page.function saveNewProject(project) { var projectName = project.name; ProjectsService.addProject(project.name) .then(function (result) { vm.projects.push(result); vm.closeProjectModal(); project.name = ''; $state.go('tasks', { projectId: result.id, projectName: result.name }, { location: true }); }); }
Make sure to expose the saveNewProject function to the view
vm.saveNewProject = saveNewProject;- If you don’t already have ionic serve running, open a command prompt and run the command ionic serve
- You should now be able to successfully add a new project into the list and have it redirect you to the tasks page
10.0.3: Updating Title on Tasks Page
One of the parameters that we are passing to the Tasks state is the project name. We are going to update the tasks header to show the project name. You would think that you could just bind the the project name to the ion-view view-title attribute which you can but it does not always work correctly when dynamic text like this. Instead you need to use a ion-nav-title.
Capture Project Name from $stateParams
- Open the www/js/controllers.tasks.controller.js file
Add a new variable named
vm.projectNamethat gets the$state.projectNamevm.projectName = $stateParams.projectName
Update Task UI to Show Project Name in Title
- Open the www/templates/tasks.html file
Before the
<ion-content>element add a<ion-nav-title>html element and set the value toTasks:<ion-nav-title>Tasks: {{vm.projectName}}</ion-nav-title>
Update Project page to pass project name to tasks
- Open the www/templates/projects.html file
In the ion-item replace the ng-href link to the tasks page with the
ui-srefbelow.ui-srefallows us to call the tasks route and pass in a json object of parameters to use.ui-sref="tasks({ projectId: project.id, projectName: project.name })"Only parameters that are listed in the route will get populated
Update tasks route to support projectName parameter
- Open the www/js/config/app.config.js file
Add a params property onto the
tasksroute. The params property is a json object and we need to create a projectName key and set it to an empty string. Your route should now look like (order is not important in the state json object)..state('tasks', { url: '/tasks/:projectId', templateUrl: 'templates/tasks.html', controller: 'TasksController as vm', params: { projectName: "" } })- If you don’t already have ionic serve running, open a command prompt and run the command ionic serve
- When you navigate from a project to a task, the project name should appear in the header on the task page
10.1: New Task Page
The work to create a “new tasks” modal dialog, call the api and update the ui is pretty much exactly the same as we did with the “new project” dialog above.
10.1.1: Modal Dialog
Create the modal template file
- In the www/templates directory created a new file called tasks-modal-add.html
- In the tasks-modal-add.html file, use the
i1_modal_htmlsnippet to generate the view boilerplate code and set the title to “New Tasks” - Press Esc or Enter to exit the snippet
Wiring up the show and hide for the modal
In the www/templates/tasks-modal.add.html file to the
ion-header-barwe are going to add a button to the header after the title that will close the dialog when it is opened.<button class="button button-clear button-positive" ng-click="vm.closeTaskModal()">Cancel</button>- Open up the www/js/controllers/tasks.controller.js file
Inside the
activatefunction we need to setup theionicModalwith what template to use and set the scoping variable for the modal.$ionicModal.fromTemplateUrl('templates/tasks-modal-add.html', { scope: $scope }).then(function (modal) { vm.taskModal = modal; });Make sure to inject
$scopeand$ionicModalinto the controllerTasksController.$inject = ['TasksService', '$stateParams', '$scope', '$ionicModal']; function TasksController(TasksService, $stateParams, $scope, $ionicModal) { ..... }In order to have the modal open and close we need to create the functions to call the vm.projectModal
show()andhide()functions.function showTaskModal() { vm.taskModal.show(); } function closeTaskModal() { vm.taskModal.hide(); }We need to make sure that these 2 functions are exposed to the view by adding them to the vm variable at the top of the
TasksControllerfunctionvm.showTaskModal = showTaskModal; vm.closeTaskModal = closeTaskModal;
The last thing before we can test the show and hide functionality is to add a way to launch the modal dialog on the Task page. We are going to do that by adding an icon into the header that will launch the modal.
- Open the www/js/templates/tasks.html file
- Between the
<ion-nav-title>and<ion-content>we need to add a<ion-nav-buttons>section by using the ionici1_navbuttons_rightsnippet- ng-click: vm.showTaskModal()
- content: use the
i1_IconComposesnippet
- Press Esc or Enter to exit the snippet editing
- To the <button> element add the css class
button-icon - If you don’t already have ionic serve running, open a command prompt and run the command ionic serve
- On the Projects page you will now see a
 . If you click on the icon the “New Task” modal should open up and if you click the cancel text on the modal it should close it.
- On the Projects page you will now see a
Now lets add the actual form to input the “New Task”
- Open the www/templates/tasks-modal-add.html
Inside of the
<content>section add the following form<form ng-submit="vm.saveNewTask(vm.task)"> <div class="list"> <label class="item item-input item-text-wrap"> <input type="text" placeholder="Task Name" ng-model="vm.task.name"> </label> </div> <div class="padding"> <button type="submit" class="button button-block button-positive">Create Task</button> </div> </form>When you open up the modal, the form will look like this
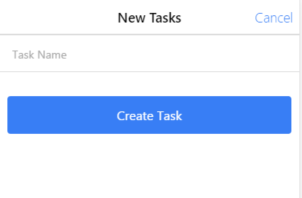
We are now ready to wire up the form to post data to the API.
10.1.2: Posting to our API
In this section we will be adding the functions needed to send data to the API and bind it to the UI for the Task page.
Creating the Service Add Functions
- Open the www/js/services/tasks.service.js
Add a new function called
addTaskthat takes 2 parameters: name and projectIdfunction addTask(name, projectId) { }Don’t forget to expose the function by adding it to the service object at the top of the
TasksServicefunctionvar service = { getTasks: getTasks, addTask: addTask };- In the
addTaskfunction we are going to create a JSON object calledtaskthat has properties:name,created_on,completedandproject_id- name: name
- created_on: new Date()
- completed: false
project_id: projectId
var task = { “name”: name, “created_on”: new Date(), “completed”: false, “project_id”: projectId };
To send data to Back& we need to create a $http post call that calls
Backand.getApiUrl() + '/1/objects/task'and passed in thetaskjson object as a data property. This will then return a promise that we want to capture and returnresult.datareturn $http({ method: 'post', url: Backand.getApiUrl() + '/1/objects/task', data: task, params: { returnObject: true } }) .then(function (result) { return result.data; });
Wiring Up the Controller
- Open the www/js/controllers/task.controller.js file
- Create a new function called saveNewTask that takes in an object named task
This function will call the
TasksService.addNewTaskfunction and pass thetaskNameandprojectIdvariables. Then upon successful it will add the task to the UI project list, close the modal, and clear out the new task name form field.function saveNewTask(task) { var taskName = task.name; TasksService.addTask(task.name, projectId) .then(function (result) { vm.tasks.push(result); vm.closeTaskModal(); task.name = ''; }); }
Make sure to expose the saveNewTask function to the view
vm.saveNewTask = saveNewTask;- If you don’t already have ionic serve running, open a command prompt and run the command ionic serve
- You should now be able to successfully add a new task into a project. To ensure that it got added to the API, either refresh the Task page after you have added it or navigate back to the project list and then back into the task list for that project.
Wrap-up
In this lab we saw how to use the $ionicModal, pass additional state parameters into a route, and send a post to a REST api.